 UK
UK Nederlands
 Deutschland
 US
US La France
Installing the roof hatch
Installing the roof access hatch
Staka roof access hatches are delivered to your construction site completely assembled with installation slots for installation on the roof. The roof access hatch must be installed on the roof correctly for optimum use. Installing the roof access hatch correctly will also ensure a long service life, keep its guarantee valid, ensure only minimal maintenance is required, provide draughtproofing and waterproofing, and assure safe access to flat roofs.
All Staka roof access hatches are delivered with a complete installation manual so that you always have the installation instructions at hand. Below are brief instructions for the installation for the different Staka roof access hatches. The complete installation manual that is supplied with the roof access hatch can also be downloaded here.
Roof access hatch with ladders and fixed staircases
Step 1: The roof opening
The most important point to note when installing a roof access hatch is that the measurements of the opening of the roof are the same as the clear width (inside dimension) of the roof access hatch. The roof opening can be further increased by the thickness of the trim material such as multiplex sheets. The trim material is fit flush with the bottom of the mounting flange of the upstand creating a neat and uniform finish.
Step 2: Yes/no structural rising
Make sure that the upstand protrudes at least 80 mm above the finished roof. A thick insulation package may result in the upstand having to be placed on a raised structure.
Step 3: Anchor the roof hatch
Installing the upstand on the roof. Ensure that the surface is completely level and install the roof access hatch so that it cannot twist or bend.
Step 4: Glue in the roof hatch
Glue in the roof access hatch using roofing material. Attach the roofing material as far as the top of the water trap of the upstand. The upstand comes with insulating material with a laminate that can be attached against different types of roofing materials.
Roof access hatch with retractable ladder
For roof access hatches with retractable ladders, the roof opening is always smaller than the clear width of the roof access hatch for safety reasons. The last step of the retractable ladder is positioned lower because the retractable ladder is always located at the height of the ceiling. This makes the last step taken from the top step of the retractable ladder to the upstand of the roof access hatch too big. By reducing the size of the roof opening you create that necessary extra step with the piece of roof.
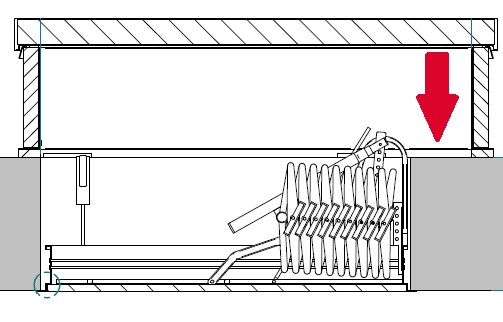
Staka delivers a wooden installation frame with all roof access hatches with a retractable ladder. The wooden installation frame is attached and the upstand of the roof access hatch is placed on top of this. If the roof floor (including any lowered ceiling) is not at least 250 mm, you will need to fix the roof access hatch to a newly constructed upstand to ensure that the retractable ladder does not come into contact with the roof access hatch when closed.
Make sure that the upstand protrudes at least 80 mm above the finished roof. The final step is sticking the roofing material to the roof access hatch upstand to create a waterproof closure.
Roof access hatch withglass
A roof access hatch with glass must always be installed at a 5⁰ pitch. This reduces condensation.
Installation of an electric roof access hatch
The electrical operating system of the roof access hatch consists of a control box, two motors, and one wireless remote control to operate the control box. The installation of the electric roof access hatch on the roof is almost exactly the same as the installation of a manual roof access hatch. Only after installation does the electric roof access hatch require a few extra steps to be taken:
Step 1: Open de control box
The control box must be opened to retrieve the remote control stored inside.
Step 2: Connecting motors
The plugs of the motors must then be connected to the plugs of the control box and the pull relief tightened. This will ensure a solid connection between the control box and the motors.
Step 3: Connect to mains power
Insert the plug into the electrical socket to charge the emergency battery. Install the control box for the electric roof access hatch in the wall or ceiling for a neat finish. Make sure that it is not placed too close to metal or other electrically conductive materials, so as to avoid interference with the remote control signal.
The mains electricity supply cable is five metres long, so ensure that the control box is placed no more than five metres form the roof access hatch. The control box can be connected to other external electrical systems such as a fire alarm system or rain sensor. The control box has a separate input for this. The complete instruction manual for the control box can be downloaded here.
If you still have unanswered questions, go to our F.A.Q. or call one of our advisers on 01789 330558
Contact us, we will gladly help you!
Request an online quote and receive an offer, including all relevant document, within a couple of minutes.
Instant Quote
Do you need help in selecting the best roof hatch for your needs? We are happy to help! Call us directly on +31(0)162-763763
Call us


- 2026 © STAKA Bouwproducten B.V.
- PostAds
- All rights reserved.